Pc guide on how to Fix Windows 7 When It Fails to Boot

Windows 7 booting error fix
There's a fix for windows 7 error in booting or failure to boot.
Whether caused by a virus, a new operating system or by simple mistake, being faced with an "Operating System not found" or similar error during your computer system's boot up can be a nerve rattling experience. Assuming you have Microsoft's Window 7 installed however, do not fear, such a boot error can often be resolved in just a few simple steps.

First, check your BIOS and hardware

In many cases, having Windows 7 fail to boot may be as simple as having your BIOS set with an incorrect boot order sequence. It can be quite common if you have more than one hard drive installed in your computer and your BIOS gets reset. Usually you can access your BIOS seconds after your computer turns on by pressing the Delete button or by pressing a specific function key. Once in the BIOS, check to see that your system drive is listed appropriately in the boot order sequence; you may need to refer to your motherboard manual for help.

Another possible reason for Windows not being detected upon start up is a hardware issue. If your BIOS is unable to detect your system drive, check to make sure all the cables are plugged in properly. If your hard drive is making an odd noise, such as a clicking sound, your hard drive may be broken. Finally, it is possible that the hard drive is having data corruption issues, which has damaged important system data, such as the Master Boot Record (MBR). If you suspect a faulty hard drive, it may be a good idea to backup and scan your hard drive for errors from another computer and possibly consider buying a replacement. Trying to repair a boot problem on a damaged drive can possibly lead to even more data loss, so backup your data before attempting anything.

The MBR and other important boot data can also be damaged by trying to install an earlier version of Windows, such as Windows XP, alongside Windows 7 and by third-party programs, such as viruses. In the case of a virus, it is recommended that you run a virus scan of the drive before attempting any repairs as otherwise it could lead to more data loss. It is further possible to achieve the appearance of damaged boot data by having the wrong drive partition set to active, which can be the outcome of an overly curious Windows user with administrative permissions.

Fixing the MBR and other start up problems in Windows 7 is most quickly accomplished by using the Windows 7 Installation DVD. If you do not have a Windows 7 Installation DVD however, you can alternatively use a Windows 7 System Recovery Disc, which we will show you how to create further down in this article.  If you do not yet have either a Windows 7 Installation DVD or a recovery disc, do yourself a big favor and make a recovery disc right away to avoid any unnecessary headaches down the road.

Fixing the Master Boot Record (MBR)

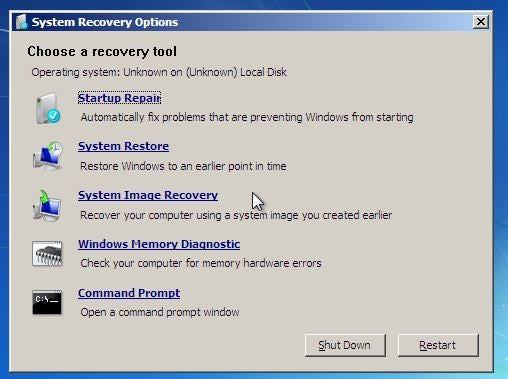
Step one: Turn your computer on, booting from either your Windows 7 Installation DVD or Windows 7 System Recovery Disc.  Remember, you may need to change the boot order inside your BIOS to have the your DVD drive boot first.

Step two: After the installation or recovery disc loads, if prompted, select your language settings and then continue.  If you are using the installation DVD, when prompted by the following screen select Repair your computer.
Step three: The computer will take a moment now to scan itself for any Windows installations, after which you will likely be given a choice to select which installation you wish to repair.  Select the appropriate Windows installation from the list and then continue. If by chance a problem is detected in one of your Windows installations at this initial stage, the system may also ask you if it can try to repair the problem automatically. It is up to you if you wish to let the system try to repair itself, but otherwise just select No
Step four: Once you have reached the System Recovery Options screen, as shown below, you will be faced with a list of choices that can aid you in repairing a damaged Windows 7 operating system.  If you wish to try the Startup Repair option first, it is often successful in automatically fixing many different start up issues, but in this article we will be using the Command Prompt option to resolve our problems manually. So, click Command Prompt to continue. 
Step five: Now sitting at the command prompt, enter the following command and then press enter:

         bootrec.exe /FixMbr
If successful, you should be greeted with the message The operation completed successfully.  That's it!  Your Master Boot Record has been repaired.

While the above command does fix the MBR, and sometimes that is enough, there still might be an error with the system partition's boot sector and Boot Configuration Data (BCD). This might occur if you have tried to install another operating system alongside Windows 7, such as Windows XP.  To write a new boot sector, try the following command:

        bootrec.exe /FixBoot
If you are still faced with your Windows 7 installation not being detected during start up, or if you wish to include more than one operating system choice to your system's boot list, you can try the following command to rebuild your BCD:
       
        bootrec.exe /RebuildBcd

The above command will scan all your disks for other operating systems compatible with Windows 7 and allow you to add them to your system's boot list. If this fails, you may need to backup the old BCD folder* and create a new one in its place with the following commands:

        bcdedit /export C:\BCD_Backup
        c:
        cd boot
        attrib bcd -s -h -r
        ren c:\boot\bcd bcd.old
        bootrec /RebuildBcd
*Some users also find simply deleting the boot folder and retrying the above steps effective at resolving boot issues, but it is not recommended.

How to change active partitions
Upon purposely changing the active partition on my system drive, I was faced with a BOOTMGR is missing error during my system's start up that prevent Windows from starting. It is a common mistake to make when playing with partitions on a system drive and it can be a headache to solve if not prepared. To change your active partition back using the Windows 7 recovery disc or Installation DVD, follow the steps below.

Step one: Follow steps one to four in the above guide. This should take you to the Command Prompt in the Windows Recovery Environment.

Step two: Type DiskPart and then press Enter.

Step three: Type List Disk now and then press Enter. This command will list all disks attached to your computer and assign them a disk number.

Step four: Type Select Disk x, where x is the number for the disk containing the partition you wish to make active. Press Enter.

Step five: Type List Partition and then press Enter. You will now be shown a list of the partitions on the selected disk. Determine which partition you wish to make active.

Step six: Type Select Partition x, where x is the number of the partition you wish to make active.

Step seven: Now, just type Active and then press Enter. That should be it - the selected partition is now active.
How to create a Windows 7 System Recovery Disc
Windows 7 makes it easy to create a System Recovery Disc if you already have Windows 7 installed and running. 

Step one: Click Start > All Programs > Maintenance > Create a System Repair Disc
Step two: Insert a blank CD or DVD into your disc drive.

Step three: Click Create disc and let the program do its thing.
That's it! It only needs to write about 140- to 160-megabytes to the disc, depending on whether your OS is 64-bit or 32-bit, and that should only take a minute. If you do not have a CD/DVD-R drive to create a recovery disc with, you can alternatively download the ISO image of the Windows 7 System Recovery Disc and use it to make a bootable USB flash drive.

How to create a Windows 7 System Recovery USB flash drive
Step one: If you do not have a DVD drive, download the appropriate Windows 7 Recovery Disc image from Here. You will need a torrent client for this step, such as µTorrent. Alternatively, if you have a DVD drive, you can use an existing Windows 7 Installation DVD or a Windows 7 Recovery Disc when at step seven. 

Using a Windows 7 Installation DVD at step seven will also allow you to install Windows 7 via USB, not just recover a damaged system; very useful if you have a netbook!

Step two: Open a command prompt with administrative rights. To do this, click Start > All Programs > Accessories and then right click Command Prompt, followed by clicking Run as administrator.

Step three: After accepting any UAC verification questions, you should now be at the command prompt. Make sure your USB flash drive is plugged in and then type DiskPart, followed by pressing Enter.

Step four: Type List Disk and then press Enter. Determine which disk number corresponds to your USB flash drive. In the following scenario, Disk 1 corresponds to our USB drive since we know our USB drive has a capacity of 2-gigabytes.

Step five: Enter the following commands in order, changing the disk number to the disk number listed for your USB drive.  Warning - the following commands will erase everything on your USB drive or the disk you select.
        Select Disk 1
        Clean
        Create Partition Primary
        Select Partition 1
        Active
        Format FS=NTFS
Step six: After DiskPart successfully formats the USB drive, which might take a few minutes, you will want to enter the following commands:

        Assign
        Exit

Step seven: You will now need to copy the contents of the ISO image you downloaded, or the contents of a DVD you wish use, to the USB flash drive.  There should be two folders and a file in the ISO image that need to be copied. To extract the files contained within an ISO image, you will need to use a program such as WinRAR. You can download WinRAR from here.

Step eight: Now that the files are copied, we will want to make the USB drive bootable. To accomplish this however we will need to download a small file called bootsect.exe; it can be downloaded from here or here. The file can also be found in the boot directory of the Windows 7 Installation DVD.  Once downloaded, place the bootsect.exe file in the root directory of your USB flash drive.

Step nine: Back at the command prompt, we will want to change the current directory to that of the USB drive and run the bootsect command. In our case this is drive E, so we will be using the following respective commands:

          e:
          bootsect /nt60 e:

The bootsect command will update the target volume with a compatible bootcode. If all goes well, you should now have a bootable USB recovery drive; just remember to add the USB drive to the boot list in your system's BIOS for it to work upon start up.

http://www.tomshardware.com/news/win7-windows-7-mbr,10036.html

windows error codes - - fix win 7 error messages

What are error codes and how can I use them?

Error codes are numbers (or letter and number combinations) that are associated with error messages and are used to identify specific problems in Windows and other programs.
Picture of an error code
Windows Update error code
If the error message does not provide all of the information you need, use the following resources to learn more:
  • Search for the error code online, starting with the Windows website.
  • Search for the error code online in the Events and Errors Message Center on the Microsoft website.
  • Search for the error code in online Windows newsgroups, communities, and other websites. From the results, you might be able to determine if anyone else is also experiencing this problem and find troubleshooting steps. If you get too many results, you can add other keywords to your search, such as the program name that produced the error message.
  • Search your computer event logs for information. Here's how:

    To view error event logs for applications

    You must be logged on as an administrator to perform these steps.
    1. Open Event Viewer by clicking the Start button Picture of the Start button, clicking Control Panel, clicking System and Security, clicking Administrative Tools, and then double-clicking Event Viewer. Administrator permission required If you're prompted for an administrator password or confirmation, type the password or provide confirmation.
    2. In the left pane, double-click Applications and Services Logs, browse to the specific program that had an error, and then review any error events for that program.
    3. Double-click an event to view a description and to find links to more information.

windows 7 System Error Codes

Note  
The information on this page is intended to be used by programmers so that the software they write can better deal with errors. If you are an end-user that is experiencing difficulty with an application you are installing or running, contact customer support for the software that is displaying the error message. To obtain support for a Microsoft product, go to http://support.microsoft.com.

The System Error Codes are very broad. Each one can occur in one of many hundreds of locations in the system. Consequently the descriptions of these codes cannot be very specific. Use of these codes requires some amount of investigation and analysis. You need to note both the programmatic and the run-time context in which these errors occur. Because these codes are defined in WinError.h for anyone to use, sometimes the codes are returned by non-system software. Sometimes the code is returned by a function deep in the stack and far removed from your code that is handling the error.

The following topics provide lists of system error codes. These values are defined in the WinError.h header file.

Suggestions?

If you have additional suggestions regarding the System Error Codes documentation, given the constraints enumerated at the top of the page, please click the link labeled "Send comments about this topic to Microsoft" below. We appreciate the input.

speed up pc for windows 7, win 8

Speed up your PC

Are you sure that you're getting the very best performance out of your PC? Whether you're running Windows Vista or Windows 7, try these tips to give your PC a little extra zip.

Limit how many programs run at startup

There are a lot of programs that load automatically when you boot up your PC—which can really hamper performance. To manage these programs like a pro, learn how to get a comprehensive view of what's running:
  • Click the Start button Picture of the Start button, type System Configuration in the search box, and then click System Configuration in the list of results.
    The System Configuration dialog box
    The System Configuration dialog box
  • Click the Startup tab. The programs set to run at startup are indicated with a check mark. You can clear the check boxes for any nonessential programs to disable them, but make sure you only disable programs you're familiar with. When in doubt, don't clear the check box.

Delete, delete, delete

A clean machine is a fast machine. That means your best option is to uninstall all the programs you don't use. Delete things like trial software, limited-edition versions, and anything else you're never going to use. Antivirus software? Just testing. You always want your security program, but make sure you're only running a single, up-to-date program. To uninstall software:
  • Click the Start button Picture of the Start button, and then click Control Panel.
  • Under Programs, click Uninstall a program. (If you don't see this page, change the View by option in the upper-right corner to Category.)
    Uninstalling a program in Control Panel
    Uninstalling a program in Control Panel
  • Click the program you want to delete, and then click Uninstall.

Run fewer programs at the same time

If your PC bogs down while you're working, check to see how many programs you have running. All programs take up system memory, which can have a huge impact on performance. In some cases, having multiple instances of a program (such as several open email messages) or multiple versions of a program type (more than one antivirus program) can use up memory. Respond to and close your messages right away and keep open only the programs that are necessary for the work you're currently doing—and you'll see a boost in speed.

Make ReadyBoost your friend

It's all very well to advise you to close programs you're not using—but just because you're not using it now doesn't mean you won't be using it in 10 minutes. The answer is ReadyBoost, a helpful feature that can use the extra space on a flash card or USB storage device to speed up your PC. Plug in a compatible storage device and click Speed up my system when you see the AutoPlay dialog box.

Troubleshoot

If your PC was whizzing along merrily and then suddenly started lagging, run a virus scan. Clean bill of health? Try a troubleshooter:
  • Click the Start button Picture of the Start button, and then click Control Panel.
  • In the search box, type Troubleshooting, and then click Troubleshooting in the list of results.
  • Under Systems and Security, click Check for performance issues.
    Troubleshooting in Windows 7
    Troubleshooting in Windows 7
  • Run the Performance troubleshooter by clicking Next in the lower-right corner.

Clean your hard drive

The more you use your PC, the more programs you use and the more services you're running. Closing a program doesn't always close the service. That's why restarting fixes so many problems; it clears out the memory.
You should also make a habit of cleaning your hard disk to remove temporary files, emptying the Recycle Bin, and getting rid of system files you don't need any more:
  • Click the Start button Picture of the Start button, type Disk Cleanup in the search box, and then click Disk Cleanup in the list of results.
  • After the utility runs, you'll see how much disk space you can free up.
  • Click OK, and then click Delete Files.
    Deleting files with Disk Cleanup
    Deleting files with Disk Cleanup

Check your hardware

Is your PC still slow? Take a look at the Windows Experience Index, a method of rating your PC on five key components. Depending on your particular hardware, you might need a new PC or some hardware upgrades. To see your Windows Experience Index:
  • Click the Start button Picture of the Start button, type Performance Information and Tools in the search box, and then click Performance Information and Tools in the list of results.
  • Click Re-run the assessment in the lower-right corner of the window.
  • Check out your base score. If your score is lower than 3, it might be time to consider a new PC.

Keep your PC up to date

One of the best things you can do to protect your PC is also one of the easiest: Make sure you are set up to get automatic updates from Microsoft. If you use Windows and other Microsoft software, such as Microsoft Office or Windows Live Essentials, then you should use the Microsoft Update service. You'll also get notices about new Microsoft software that you can download for free.
So how do you turn on automatic updates? Simple: Go to the Microsoft Update website. If you don't have automatic updates turned on, we'll help you through the process.
The Microsoft Update website

Adjust visual effects

"Pretty is as pretty does,” my grandmother used to say. Maybe she wasn't referring to computers, but the principle still applies. Windows includes some stunning effects, but if you need more speed you can customize the settings you want to use for the appearance of Windows on your computer.
  • Click the Start button Picture of the Start button, type Performance Information and Tools in the search box, and then click Performance Information and Tools in the list of results.
  • Click Adjust visual effects.
  • Here you can decide if you want to let Windows choose what's best for your computer, adjust for best appearance, or adjust for best performance.
    Adjusting visual effects in Windows 7
    Adjusting visual effects in Windows 7

About the author

Zia Munshi is a freelance writer and copywriter who has written for a wide variety of publications and companies, including Microsoft and MSN. She especially loves writing about technology because it gives her an excuse to buy all the latest gadgetry and software. She lives in Seattle with her husband and her dog.

speed up Windows 7

You don't have to live with a Windows 7 machine that's becoming unbearably slow. Here are 10 basic steps that will optimize system performance.

With Windows 7, Microsoft did a really good job making the system perform well. However, over time, Windows 7 systems can slow down and need some care and feeding to regain their former glory. Further, some Windows 7 features can be leveraged to improve overall system performance. In this article, I will outline 10 steps you can take to boost the performance of your Windows 7 systems.

Note: This post is also available as a PDF download.

1: Disable unnecessary services

Not every system service that is running on a stock Windows 7 machine is necessary. A number of services can either be disabled or modified to run only when needed. Once you make these changes, the service no longer has to consume system resources and the system no longer has to spend time starting the service. Earlier this year, I wrote an article here at TechRepublic titled 10+ Windows 7 services you may not need.

2: Reduce the number of startup items

Windows 7 systems eventually begin to suffer under the weight of software that is installed in the normal course of business. Many software titles install more than is necessary and include helper applications designed solely to make the software start up more quickly or facilitate other communication (e.g., iTunes helper). And new software installations might add a permanent presence to the system tray, even if it's not absolutely necessary for the system to function (Steam games, for example).

You could go through your system tool by tool and remove the offending software, but you might want to keep the underlying tool around and just prevent the helper from loading. This and more can be accomplished through the use of MSconfig, a tool that has long been a part of Windows.

MSconfig allows you to selectively disable startup items and take other steps toward improving overall system performance.

To use MSconfig, go to Start and in the search box, type MSconfig. From the Startup tab (Figure A), you can disable items. Just be careful about what you choose.

Figure A


Disable items to improve overall system performance.

3: Remove the bloatware installed by vendors

I've long felt that Microsoft's OEMs sometimes actively work against the Redmond behemoth and sully the company's name. Nowhere is this more evident than in the case of what has become known as "bloatware."

In the never-ending race to the bottom of the PC market, lower cost PCs have had their profit margins bolstered by OEMs through the inclusion of mostly junk software - short-term trials and the like -- that does nothing but add a few dollars of profit while bringing performance to a crawl. Frankly, this is one of the reasons that I believe that Microsoft's Surface announcement, in which Microsoft noted that it would make its own device, is brilliant. The company needs to start with a clean slate in some ways (no pun intended).

If your PC shipped with a bunch of stuff you'll never use, get rid of that software. Generally, you can go to Start | Control Panel | Programs And Features (Figure B) and remove software you no longer plan to use. If the software adds items to the startup process, getting rid of it will make the PC start faster and, ultimately, perform better overall.

Figure B


Use Programs And Features to remove unwanted software.

4: Keep viruses and spyware off your system

If you're running Windows, you need to be running an anti-malware program to keep viruses and spyware off your system. Nothing will ruin good performance like a boatload of spyware. My personal favorite (and free!) tool for combating malware is Microsoft Security Essentials. In my experience, it's been successful in catching bad stuff while not significantly degrading system performance itself.

5: Check your memory

How much RAM do you have? Is your system consuming all or most of your RAM? Does the system page out to disk? If so, you're suffering a massive performance hit, which can be solved by adding more memory to your PC. Greg Shultz explains how to do this by using Resource Monitor.

6: Go solid state

Solid state is all the rage these days, and with good reason. It's fast! More and more laptops and even desktops are moving to the technology because of the performance benefits. Solid state disks use memory cells from which data can be read very quickly, as opposed to the relatively plodding nature of rotational storage. By moving to SSD, you can give your Windows 7 system renewed life -- and give yourself a whole new user experience.

But SSDs can be expensive, so you need to be smart about how to use them in the most cost-effective way. See ZDnet's Windows 7 and SSDs: Trimming the fat from your system drive for tips on manking good decisions about how to implement SSD.

7: Ensure that power settings favor performance

This one is easy! When you're plugged in, configure Windows 7's power plans to favor performance over power savings. When you choose to use Windows 7' high performance power plan, you might increase the computer's performance in some (but not all) circumstances. It really depends on the kind of work you're doing and how often you allow the computer to sit idle.

To change power plans, go to Start | Control Panel | Power Options and choose your power plan settings (Figure C). For more about how these plans operate, see Evaluate the efficiency of Windows 7 power plan settings.

Figure C


Go to Power Options to choose Windows 7 power plan settings.

8: Keep your system defragmented (unless you've followed item 6)

If you're using a traditional spinning disk in your Windows 7 system, you can keep your system operating at peak efficiency by periodically defragmenting the hard drive. If, however, you've opted to go with SSD-based storage, don't do this. First, you won't get any performance benefit and second, you'll significantly reduce the life of that expensive SSD.

Disk defragmentation is scheduled to take place once per week, but you can change this by going to Start | Accessories | System Tools | Disk Defragmenter (Figure D). In addition to changing the schedule, you can run an on-demand defrag from here. You can also run a defrag from the command line instead of from a GUI. Bill Detwiler's video explains how.

Figure D


You can schedule a defrag in the Disk Defragmenter dialog box.

9: Disable or tune search indexing

Windows 7's search is good, but it can also affect system performance. If you really need to run a tool at full tilt, you can disable indexing altogether. Or you can tune the indexer to meet your specific needs, possibly reducing its overall impact on system performance.

10: Use ReadyBoost

Perhaps you don't want to jump into the solid-state game right away but would like some of the benefit that can be had from flash-based storage. Using nothing more than a USB stick, you can do so through a Windows 7 feature known as ReadyBoost. (Note that if you're already using an SSD as your system drive, ReadyBoost won't be available, since there would be no performance gain.)

ReadyBoost allows the system to make use of one of these speedy storage devices as a cache, improving overall performance of the system. The flash storage device that you choose to use for ReadyBoost should meet the following specifications set by Microsoft:
  • Capacity of at least 256 MB, with at least 64 kilobytes (KB) of free space
  • At least a 2.5 MB/sec throughput for 4-KB random reads
  • At least a 1.75 MB/sec throughput for 1MB random writes
Here's another nice feature: If Windows doesn't think ReadyBoost will provide a performance gain, it will tell you and won't let you enable it. In Figure E, you can see that I've opened the properties for a portable USB stick, which I've added to my Windows 7 system. 
 
However, Windows knows that the system disk is already fast enough, so ReadyBoost isn't available as an option. If you want to learn more about how to enable and configure ReadyBoost in your system, see Take a closer look at ReadyBoost features in Windows 7.

Figure E


ReadyBoost isn't needed for this system.

About Scott Lowe

Since 1994, Scott Lowe has been providing technology solutions to a variety of organizations. After spending 10 years in multiple CIO roles, Scott is now an independent consultant, blogger, author, owner of The 1610 Group, and a Senior IT Executive w...

windows 7 errors and how to fix win 7 boot error

You sit up suddenly in a cold sweat, and scream. But you're in bed, and it was just a bad dream. Sighing with relief, you get up, get dressed, go to work, and turn on your PC.
 Then you sit up suddenly in a cold sweat, and scream--but this time, it's not a dream. It's a Windows nightmare.

Compared with its predecessors, Windows 7 is remarkably secure and dependable. It's far from perfect, though: An unbootable PC, a nasty piece of malware, or a single but important file gone missing can make you lose days or even months of work. And you can't solve every nightmare by waking up.

Here are ways out of six common Windows 7 disasters. I'll tell you how to fix a PC that won't boot, retrieve files from an inaccessible hard drive, stop frequent Blue Screens of Death, restore a forgotten administrator password, remove malware, and find a missing file.

1. Your PC Won't Boot

If turning on your PC doesn't bring you into Windows, try booting from a Windows 7 DVD or a recovery disc.
Boot from a Windows 7 System Repair Disc, and you'll find tools to heal an unbootable PC.
You may already have the DVD. If Windows 7 didn't come with your computer but you installed it yourself, you have the disc. If you don't have it, you can borrow someone else's disc. 
  Alternatively you can borrow someone else's Windows 7 computer and use it to create a System Repair Disc (you can also do this on your own PC before it has a problem). To create the disc, click Start, type system repair, select Create a System Repair Disc, and follow the prompts.

If your computer won't boot from the CD, go into its setup screen and change the boot order so that the optical or CD/DVD drive comes before the hard drive. I can't tell you exactly how to do this since it differs from one PC to another. When you first turn on the computer, look for an on-screen message telling you to press a particular key 'for setup'.
If your PC fails before you can enter setup or boot from a CD, you have a hardware problem. If you're not comfortable working inside a PC, take it to a professional.

But let's assume that the CD boots. When it does, follow the prompts. Likely the utility will tell you very soon that there's a problem, and it will ask if you want to fix the problem. You do.
If it doesn't ask you, or if the disc can't fix the issue, you'll see a menu with various options. Startup Repair and System Restore are both worth trying.

2. You Can't Access the Hard Drive

If Windows can't boot because the PC can't read the hard drive, none of the solutions above will work. But that's not the worst of it: Unless you have a very up-to-date backup (and shame on you if you don't), all of your files are locked away on a possibly dead hard drive. Secondary drives you don't boot off of, both internal and external, also can die with important data locked away on them.
If you can't access your hard drive, Recover My Files might be able to do what its name implies.
If the drive is making noises that you've never heard before, shut off the PC immediately. In that case you have only one possible solution, and it's expensive: Send the drive to a data-retrieval service. Drivesavers and Kroll Ontrack are the best known, although they're not necessarily better than smaller, cheaper companies. Expect to pay hundreds or even thousands of dollars. If your drive sounds okay, however, you may be able to recover the files for only $70 with GetData's Recover My Files
  If the sick drive is the one you use to boot Windows, you'll have to remove it from the PC and access it on another computer. You can do so by making it a secondary drive in a desktop PC, or by using a SATA-USB adapter such as the Bytecc USB 2.0 to IDE/SATA Adapter Kit.

The free, demo version of Recover My Files will show you which files can be recovered (almost all of them, when I tested it) and even display their contents. Once you've paid the $70 license fee, the program can copy the files to another drive. If that doesn't work, you'll need to use a retrieval service.

3. Blue Screens of Death Attack Your PC Regularly

BlueScreenView can show what Windows was doing before disaster struck.
One second you're working productively, the next you're staring at a blue screen filled with meaningless white text. If it happens occasionally, you curse, reboot, and get on with your work. If it happens regularly, you have a problem that needs fixing. 
  Windows 7 keeps logs of these "Stop Errors." (That's Microsoft's term; everyone else calls them "Blue Screens of Death," or BSoDs.) To view the logs and make sense of them, download and run BlueScreenView, a free, portable program by NirSoft (portable means you don't have to install it). The program shows you what drivers were running at the time of the crash, and highlights the likeliest suspects. If the same drivers come up from multiple crashes, you should definitely update them.

Speaking of updating drivers, you should make sure that all of them are current. SlimWare Utilities' free SlimDrivers makes this chore remarkably easy, as it scans Windows and lists which drivers need to be updated. If you register (that's free, too), it will find the drivers and run the update for you. It even offers to create a restore point before each update. Don't update all of your drivers at once, however; if you do, and one of them makes things worse, you'll have a tough time figuring out which one.

Frequent BSoDs can also be a sign of hardware problems, especially bad RAM. Although Windows 7 has its own memory-diagnostics program, I prefer the free Memtest86+, which you have to boot separately. You can download the program either as an .iso file--from which you can create a bootable CD--or as an .exe file that will install the program and its bootable operating system onto a flash drive.

4. No One Has the PC's Administrator Password

If the wrong person leaves your company in a huff, one or more PCs could be left stranded. With no one in the company knowing the password to an administrator-level account, you can't install software, change important settings, or possibly access encrypted data.

Fortunately, you can remove the password, letting you log on to that account. You do that with the Offline NT Password & Registry Editor, a bootable, text-based free program that you download as an .iso file. Double-click that file, and Windows 7 will start the process of burning it to a CD.
Sure your drivers are up-to-date? SlimDrivers can automate this otherwise time-consuming job.
Boot the CD and follow these instructions. I've put the on-screen prompts in italics. After you type your answer, press Enter
  boot: Just press Enter.
Select: [1]: Above the prompt you'll see a list of hard-drive partitions. Select the right one by typing that number.
What is the path to the registry directory?...: The default is probably correct. Just press Enter.
[1]: 1
What to do? [1] ->: 1
or simply enter the username...: Type the name of the administrator account. If you're not sure what it is, all of the account names are listed above the prompt.
Select: [q] >: 1
Select: ! - quit...: !
What to do [1]: q
About to write file(s) back...: y
New run? [n]: n
# Remove the CD and reboot.

You should now be able to log on to the administrator account without a password. For security purposes, don't forget to create a new password for the account. Just be sure to remember what it is.

Windows 7 unexpected I/O error 0xc00000e9


windows 7 error fix,error 0xc00000e9 New computer running Windows 7, unexpected I/O error 0xc00000e9
We have a brand new computer, only 2 days old, and all of a sudden we are getting this error upon booting up:

Windows has encountered a problem communicating with a device connected to your computer
If you continue to receive this error message contact the hardware manufacturer

Status:  0xc00000e9

Info: An unexpected I/O error has occurred

All I can do is hit Enter or ESC and either key causes the computer to reboot, bringing me back to the same error screen.  I have unplugged everything from the computer except the monitor, keyboard, and mouse. 


What can I do?

The error message - An unexpected I/O error has occurred, Status: (0Xc00000e9) is a hardware error pertaining to your computer's BIOS. Basically it is telling you that the computer is not able to reliably communicate with the hard drive.

You may try startup repair. Startup Repair is designed to prevent a time-consuming reinstallation by diagnosing and repairing problems that prevent Windows from booting. Introduced in Windows Vista, Startup Repair is even easier to use because Windows 7 now installs it on your
hard drive for you.


Refer the links below for more details:
What are the system recovery options in Windows 7?
http://windows.microsoft.com/en-us/windows7/What-are-the-system-recovery-options-in-Windows-7
 Startup Repair: frequently asked questions
http://windows.microsoft.com/en-us/windows7/Startup-Repair-frequently-asked-questions

I also suggest you to update the BIOS. You must get in touch with the system manufacturer to update the BIOS.

Modifying BIOS settings incorrectly can cause serious problems that may prevent your computer from booting properly. Microsoft cannot
guarantee that any problems resulting from the configuring of BIOS settings can e solved. Modifications of the settings are at your own risk


 Regards,
Source From Afzal-Microsoft Support.
Visit our Microsoft Answers Feedback Forum and let us know what you think.


Fix 0xc00000e9 windows Errors on your PC

How to Fix 0xc00000e9 Errors on your PC

Problem: 0xc00000e9 problems occur when the system is incorrectly configured or critical system files are missing. These problems happen when a PC is not maintained properly and should be fixed immediately to avoid further damage.

Solution: To repair 0xc00000e9 errors correctly, download and install the repair tool below. This tool was created to find and fix errors on your computer and ensure your system is running flawlessly.

Download 0xc00000e9 Repair Tool
Compatible: Windows 7 (32/64), Vista, XP, 2000 & 98
Notice!!!: The risk from not repairing this problem now could include; system crashes, blue screens, and hardware failure. To ensure your PC is working correctly, please follow the repair instructions below.
Easy Instructions to fix ” 0xc00000e9 Error”
(1) Download the repair tool
(2) Install and open the tool
(3) Scan & repair the found errors.


+++++++++  Background and Manual fix (not recommended) +++++++++++++++++
When your windows registry begins to develop problems, chances are that it will begin to show you 0xc00000e9 errors. It might not look like much, but this is a very major error with most OS, as it can prevent your computer from booting up. By the time your computer develops a 0xc00000e9, it will begin to churn out error messages, stating that there is a problem with the input/output interface. The normal way you begin to experience this problem is when your computer screen blacks out, and then you seen the lone message ‘0xc00000e9’ scrawled across. The additional message you see is that Windows could not boot your computer because the input output settings that are in the system aren’t loading as they should. The immediate result is that your computer would begin to run quite slow and with a distinct loss of efficiency. A lot of computer-related problems also begin to develop. The best way to take care of this problem is to treat the problems that lead up to the 0xc00000e9 error.

Ways to handle the 0xc00000e9 problem

You might need to perform a full cleaning of your computer’s registry. Furthermore, there is the need for you to ensure that your computer can read all the files required for optimum operation of all its components. Most times, this entails that the programs and files required for a successful start up be repaired and functional.
Thus, to fix this error, you need to ensure that you are able to fix the start up errors and problems that plague your computer, and also to clean out the windows registry and bring your computer to a perfect state.

Fixing the 0xc00000e9 error

To repair your computer, you will need to begin a start-up repair of the system. Here’s how to go about this:
  1. Reboot your PC. While the system is beginning to boot, put in the Windows installation disk, which you should have gotten beforehand. Make your computer boot form the disk. Once this is done, select the ‘startup repair’ option. Your computer should be able to perform the repair function on its own.
  2. Once you are done with this step, boot your computer in safe mode, and do a complete Driver update for Windows. The reason you should load up the system in safe mode is to prevent Windows from loading any drivers or software that may be the originator of the registry problems in the first place.
To load up in safe mode, here’s what to do:
  1. Reboot your PC again, and while it is loading, repeatedly press the “F6” key to enter into the setup options of your computer. In the boot options, ensure that you have highlighted and selected “Safe Mode with Networking”.
  2. Next, you should download and run the driver finder utility. This program would take care of the task of updating and restoring all the drivers in your system. When done, restart or reboot your PC.
Finally, all you need do is to clean the registry of the system. The registry acts as a database for your system, and stores important information on your PC. Generally, the way to clean the registry is to use the registry cleaner tool. This tool would make a scan of all items in your registry and fix all the errors. There are several registry cleaner tools available on the internet. A good recommendation for a registry cleaner tool is the Frontline Registry Cleaner.

If you follow the above procedures, you should have your computer effectively recovered from the 0xc00000e9 error in little or no time.

Source: http://0xc00000e9.org/

windows 8 win 8 operating system os

The look and feel of Windows 8 is as different as the change from Windows 3.1 to Windows XP back in 2001. Unfortunately, a generation has grown up with Windows XP and people resist change, especially at first. So, I'm going to list and explain the huge differences that you will find in Windows 8 and how to work with those differences. For some Windows 8 may drive them to buy a Mac, while for others the changes will be welcomed as soon as they learn to get around the new operating system.

Here are the major changes and differences you will find in Windows 8.

    The new Modern interface

    Windows 8 boots into a tiled interface that will be familiar to users of the Windows phone, but its unlike anything a normal Windows user has ever seen. There are tiles for Mail, Calendar, Weather, People, Photos, Apps, Messaging, etc. When you click on an app, the app opens full screen. No borders, toolbars or other items to get in the way. However, there is no X in the upper right hand corner to close the app either. We'll discuss more of this interface in other articles on the site. Its definitely gonna be a love it or hate it feature.

    No Start Menu
    
This will definitely be one of the hardest changes to adapt to. The normal Start menu in the bottom left corner of the screen is no longer there. If you move your mouse to the very far bottom left corner and box will appear to take you to the Modern UI, formally known as the Metro interface

    Cloud Based
    
When you setup Windows 8 for the first time, you are asked to register an email address instead of a username. This email address is synced with your Microsoft services that you may already have. Because its cloud based, if you setup your email address on another computer as a new user, a lot of settings including favorites, passwords and other information will be synced with second computer. This is handy in one way because your information travels with you, but there are privacy concerns if someone knows your password on the second computer.

    Touch screen support
    
Windows 8 will have touch screen support for Touchscreens and tablets, but these features won't be very useful for desktop users running desktops or laptops without a touchscreen.

    Faster boot times
    
Windows 8 will boot faster than any other previous operating system.

    Internet Explorer 10 - two flavors
    
Microsoft introduces two different versions of IE in Windows 8, one for the desktop environment and a different version in the Modern UI (Tiles) environment. The desktop version is similar to other versions of IE in look and feel, but the Modern UI  version is unlike anything you've seen. Very minimalist in nature, the URL field and back/forward button are on the bottom of the screen with the rest of the screen left to view the web page. No toolbars, borders, or anything else to get in the way.

There are tons of other changes and features that we will explore of the coming weeks. Getting used to these changes and staying productive will be a chore.

http://www.pchell.com/windows8/index.shtml

Reverse mobile phone and voice over internet Phone Number Lookup

eVerify.comDo you always receive a call from an unknown number? While it might just be a prank call, it might be something that can endanger your safety and privacy. Unfortunately, it can be hard to learn more about this joker on the phone.

Although this is the case, you do not have to worry about your safety because you can obtain pertinent owner information through a process called reverse phone number lookup.

Reverse White Pages

Before the development of the internet, people who often received prank calls were able to look the numbers up through reverse white pages, also known as reverse telephone directories. Here, you can search for the unknown number that keeps on bugging you.

While helpful, reverse white pages provide limited information since they do not contain the data of unlisted digits, as well as fax or cellphone numbers.

Google Search

Since internet is readily available in most areas nowadays, conducting a Google search is one of the best ways for you to learn more about an unknown number, as well as its past number owners.

Searching through Google is very easy, all you just have to do is to type in the prank caller's number. You have a big chance of learning more about the individual through Google, although this type of search cannot show the identities behind unlisted numbers.

Reverse Phone Lookup Websites

The increasing demand for reverse phone lookup services has actually paved the way for websites who specialize on the said process.

A famous example is whitepages.com, wherein you can search for US-based numbers, as well as international phone digits. Apart from showing important owner information such as the caller's name, age, and address, you can learn more about the caller just by paying a small fee.

Prank callers keep on bugging you? By knowing the different methodologies of reverse phone number lookup, you can call them out so you can have peace of mind all the time.
                   

COMPUTER-SOFTWARES HELP CENTER

free counters