Diagnose and repair Windows File and Folder Problems automatically

Automatically diagnose and repair problems with files and folders in Windows, like deleting files or folders from the recycle bin, or trying to copy, move, rename or delete a file.
What it fixes
  • You cannot empty the Recycle Bin or delete a file or a folder inside the Recycle Bin. 
  •  When you try to rename or move a file, you receive the following error message: "The file or folder does not exist."
  • When you copy, move, rename, or delete a file on a network share, you receive the following error message: "There is a network or file permission error. The network connection may be lost" or "The folder does not exist. The file may have been moved or deleted. Do you want to create it?"
  • Your View settings or customizations for one or more folders may be lost or incorrect.
  • You cannot use keyboard shortcuts to select more than one item in Windows Explorer, or you cannot select multiple items in a Windows Explorer window by holding the SHIFT key or the CTRL key while you click the items.
  • Some icons in My Computer, in Windows Explorer, on the desktop, or on the Quick Launch Bar change randomly.
Runs on
  • Microsoft Windows XP
  • Windows 7
  • Windows Vista
  • Windows 8
Applies to
  • Microsoft Windows XP
  • Windows 7
  • Windows Vista
  • Windows 8
  •  
Microsoft Fix it
 
Instruction to Run
  • Click the Run now button below
  • Then follow the onscreen prompts to launch
 
Source: http://support2.microsoft.com/mats/windows_file_and_folder_diag/
 

see hidden files in Windows operating system computers

Ultimate protection for everything you do online

How to see hidden files in Windows 

Source: http://www.bleepingcomputer.com/tutorials/how-to-see-hidden-files-in-windows/ 

Table of Contents

  1. Introduction
  2. Windows 95
  3. Windows 98
  4. Windows ME
  5. Windows NT
  6. Windows 2000
  7. Windows XP and 2003
  8. Windows Vista
  9. Windows 7
  10. Windows 8
  11. Conclusion
   

Introduction
By default Windows hides certain files from being seen with Windows Explorer or My Computer. This is done to protect these files, which are usually system files, from accidentally being modified or deleted by the user. Unfortunately viruses, spyware, and hijackers often hide there files in this way making it hard to find them and then delete them.

By following the steps below for each version of Windows you will be able to change the operating systems behavior so that you can see hidden and protected files. In this way you will be able to delete or replaces files for troubleshooting purposes.

Windows 95
To enable the viewing of Hidden files follow these steps:
  1. Close all programs so that you are at your desktop.
  2. Double-click on the My Computer icon.
  3. Select the View menu and then click Options.
  4. After the new window appears select the View tab.
  5. Scroll down until you see the Show all files radio button and select it.
  6. Press the OK button and close the My Computer window.
  7. Now your computer is configured to show all hidden files.
Windows 98
To enable the viewing of Hidden files follow these steps:
  1. Close all programs so that you are at your desktop.
  2. Double-click on the My Computer icon.
  3. Select the View menu and then click Folder Options.
  4. After the new window appears select the View tab.
  5. Scroll down until you see the Show all files radio button and select it.
  6. Press the Apply button and then the OK button and close the My Computer window.
  7. Now your computer is configured to show all hidden files.
Windows ME
To enable the viewing of Hidden files follow these steps:
  1. Close all programs so that you are at your desktop.
  2. Double-click on the My Computer icon.
  3. Select the Tools menu and click Folder Options.
  4. After the new window appears select the View tab.
  5. Under the Hidden files and folders section select the radio button labeled Show hidden files and folders.
  6. Remove the checkmark from the checkbox labeled Hide file extensions for known file types.
  7. Remove the checkmark from the checkbox labeled Hide protected operating system files.
  8. Press the Apply button and then the OK button and shutdown My Computer.
  9. Now your computer is configured to show all hidden files.
Windows NT
To enable the viewing of Hidden files follow these steps:
  1. Close all programs so that you are at your desktop.
  2. Double-click on the My Computer icon.
  3. Select the View menu and then click Options.
  4. After the new window appears select the View tab.
  5. Scroll down until you see the Show all files radio button and select it.
  6. Press the OK button and shutdown My Computer.
  7. Now your computer is configured to show all hidden files.
Windows 2000
To enable the viewing of Hidden files follow these steps:
  1. Close all programs so that you are at your desktop.
  2. Double-click on the My Computer icon.
  3. Select the Tools menu and click Folder Options.
  4. After the new window appears select the View tab.
  5. Under the Hidden files and folders section select the radio button labeled Show hidden files and folders.
  6. Remove the checkmark from the checkbox labeled Hide file extensions for known file types.
  7. Remove the checkmark from the checkbox labeled Hide protected operating system files.
  8. Press the Apply button and then the OK button and shutdown My Computer.
  9. Now your computer is configured to show all hidden files.
Windows XP and Windows 2003
To enable the viewing of Hidden files follow these steps:
  1. Close all programs so that you are at your desktop.
  2. Double-click on the My Computer icon.
  3. Select the Tools menu and click Folder Options.
  4. After the new window appears select the View tab.
  5. Put a checkmark in the checkbox labeled Display the contents of system folders.
  6. Under the Hidden files and folders section select the radio button labeled Show hidden files and folders.
  7. Remove the checkmark from the checkbox labeled Hide file extensions for known file types.
  8. Remove the checkmark from the checkbox labeled Hide protected operating system files.
  9. Press the Apply button and then the OK button and shutdown My Computer.
  10. Now your computer is configured to show all hidden files.
Windows Vista
To enable the viewing of Hidden files follow these steps:
  1. Close all programs so that you are at your desktop.
  2. Click on the Start button. This is the small round button with the Windows flag in the lower left corner.
  3. Click on the Control Panel menu option.
  4. When the control panel opens you can either be in Classic View or Control Panel Home view:

    If you are in the Classic View do the following:
    1. Double-click on the Folder Options icon.
    2. Click on the View tab.
    3. Go to step 5.

    If you are in the Control Panel Home view do the following:
    1. Click on the Appearance and Personalization link .
    2. Click on Show Hidden Files or Folders.
    3. Go to step 5.
       
  5. Under the Hidden files and folders section select the radio button labeled Show hidden files and folders.
  6. Remove the checkmark from the checkbox labeled Hide extensions for known file types.
  7. Remove the checkmark from the checkbox labeled Hide protected operating system files.
  8. Press the Apply button and then the OK button.
  9. Now Windows Vista is configured to show all hidden files.
Windows 7
To enable the viewing of Hidden files follow these steps. Please note a guide with images that shows the same steps can be found here:
  1. Close all programs so that you are at your desktop.
  2. Click on the Start button. This is the small round button with the Windows flag in the lower left corner.
  3. Click on the Control Panel menu option.
  4. When the control panel opens click on the Appearance and Personalization link.
  5. Under the Folder Options category, click on Show Hidden Files or Folders.
  6. Under the Hidden files and folders section select the radio button labeled Show hidden files, folders, or drives.
  7. Remove the checkmark from the checkbox labeled Hide extensions for known file types.
  8. Remove the checkmark from the checkbox labeled Hide protected operating system files (Recommended).
  9. Press the Apply button and then the OK button..
  10. Now Windows 7 is configured to show all hidden files.
Windows 8
To enable the viewing of Hidden files follow these steps. Please note a guide with images that shows the same steps can be found here:
How to see hidden files in Windows 8 on bleepingcomputerforum
  1. From the Windows 8 Start Screen, click on the Control Panel app.
  2. When the Control Panel opens scroll down to the bottom and click on the More Settings option.
  3. The traditional Windows 8 Control Panel will now open. When it is open, click on the Appearance and Personalization link.
  4. Under the Folder Options category, click on Show Hidden Files or Folders.
  5. Under the Hidden files and folders section select the radio button labeled Show hidden files, folders, or drives.
  6. Remove the checkmark from the checkbox labeled Hide extensions for known file types.
  7. Remove the checkmark from the checkbox labeled Hide protected operating system files (Recommended).
  8. Press the Apply button and then the OK button..
  9. Now Windows 8 is configured to show all hidden files.
Please note that you will now see icons that were not previously visible. One of the most common concerns is that you will see a file called desktop.ini throughout your computer. These are legitimate hidden files and can be ignored.

Conclusion
Now that you know how to see all hidden files on your computer, malicious programs such as viruses, spyware, and hijackers will no longer be able to hide their presence from you or people helping you.


Ultimate protection for everything you do online 

 
If you have any questions please feel free to post them in our computer help forums.

Lawrence Abrams
Bleeping Computer Windows Basic Concept Tutorials
BleepingComputer.com: Computer Support & Tutorials for the beginning computer user.

show hidden files in win windows 7 operating system laptop desktop computer


Ultimate protection for everything you do online

 From: Bleepingcomputer.com

Windows 7 hides certain files so that they are not able to be seen when you exploring the files on your computer. The files it hides are typically Windows 7 System files that if tampered with could cause problems with the proper operation of the computer. It is possible, though, for a user or piece of software to set make a file hidden by enabling the hidden attribute in a particular file or folder's properties.

Due to this it can be beneficial at times to be able to see any hidden files that may be on your computer. This tutorial will explain how to show all hidden files in Windows 7. 

To enable the viewing of hidden and protected system files in Windows 7 please follow these steps:
  1. Close all programs so that you are at your desktop.
     
  2. Click on the Start button. This is the small round button (http://everydaymoviesextra.blogspot.com/2014/04/how-to-remove-spyware-adware-and.html) in the lower left corner of your screen that has a Windows flag on it.
     
  3. Click on the Control Panel menu option.
     
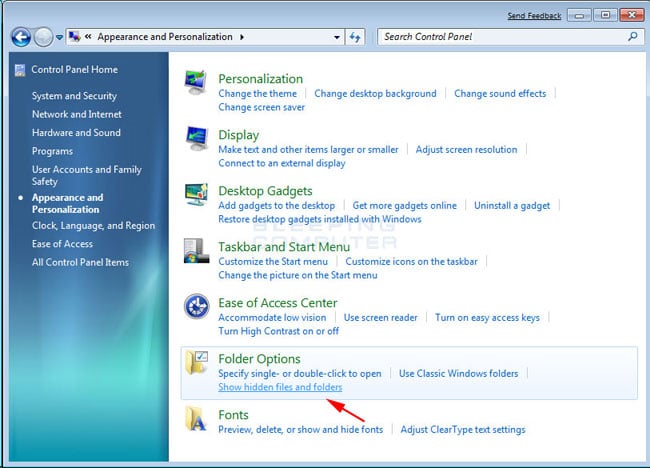
  4. When the control panel opens you will see a screen similar to Figure 1 below.


    Figure 1. Windows 7 Control Panel
    Figure 1. Windows 7 Control Panel


  5. Click on the Appearance and Personalization link.
     
  6. You will now be in the Appearance and Personalization control panel as shown in Figure 2 below.


    Figure 2. Windows 7 Appearance and Personalization screen
    Figure 2. Windows 7 Appearance and Personalization screen


    Now click on the Show hidden files and folders option as shown by the red arrow in Figure 2 above.
     
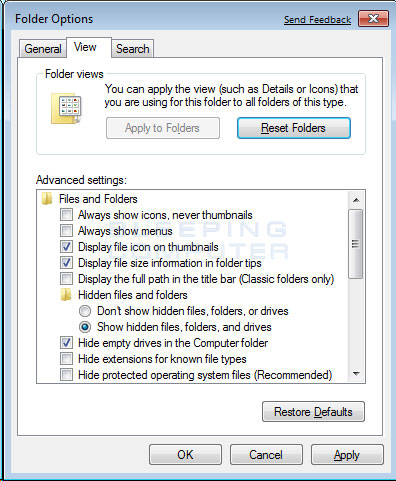
  7. Under the Hidden files and folders section select the radio button labeled Show hidden files, folders, and drives.
     
  8. Remove the checkmark from the checkbox labeled Hide extensions for known file types.
     
  9. Remove the checkmark from the checkbox labeled Hide protected operating system files (Recommended).

    Once this is done, your Folder Options screen should look similar to the following image.


    Figure 3. Folder Options screen
    Figure 3. Folder Options screen


  10. Press the Apply button and then the OK button.
You will now be at your desktop and Windows 7 will be configured to show all hidden files.
If you have any questions about this tutorial please feel free to post them in our Windows 7 forums.

Ultimate protection for everything you do online


remove computer Virus spyware trojan Worms malicious malware program

Ultimate protection for everything you do online
How to remove a Trojan, Virus, Worm, or other Malware

Table of Contents
  1. Diallers, Trojans, Viruses, Worms Oh My!
  2. How these infections start
  3. Use an anti-virus and anti-malware program to remove the infections
  4. How to remove these infections manually
  5. How to protect yourself in the future
  6. Conclusion
Dialers, Trojans, Viruses, and Worms Oh My!
If you use a computer, read the newspaper, or watch the news, you will know about computer viruses or other malware. These are those malicious programs that once they infect your machine will start causing havoc on your computer. What many people do not know is that there are many different types of infections that are categorized in the general category of Malware.
Malware - Malware is programming or files that are developed for the purpose of doing harm. Thus, malware includes computer viruses, worms, Trojan horses, spyware, hijackers, and certain type of adware.
This article will focus on those malware that are considered viruses, trojans, worms, and viruses, though this information can be used to remove the other types of malware as well. We will not go into specific details about any one particular infection, but rather provide a broad overview of how these infections can be removed. For the most part these instructions should allow you to remove a good deal of infections, but there are some that need special steps to be removed and these won't be covered under this tutorial.

Before we continue it is important to understand the generic malware terms that you will be reading about.
Adware - A program that generates pop-ups on your computer or displays advertisements. It is important to note that not all adware programs are necessarily considered malware. There are many legitimate programs that are given for free that display ads in their programs in order to generate revenue. As long as this information is provided up front then they are generally not considered malware.

Backdoor - A program that allows a remote user to execute commands and tasks on your computer without your permission. These types of programs are typically used to launch attacks on other computers, distribute copyrighted software or media, or hack other computers.

Dialler - A program that typically dials a premium rate number that has per minute charges over and above the typical call charge. These calls are with the intent of gaining access to pornographic material.

Hijackers - A program that attempts to hijack certain Internet functions like redirecting your start page to the hijacker's own start page, redirecting search queries to a undesired search engine, or replace search results from popular search engines with their own information.

Spyware - A program that monitors your activity or information on your computer and sends that information to a remote computer without your knowledge.

Trojan - A program that has been designed to appear innocent but has been intentionally designed to cause some malicious activity or to provide a backdoor to your system.

Virus - A program that when run, has the ability to self-replicate by infecting other programs and files on your computer. These programs can have many effects ranging from wiping your hard drive, displaying a joke in a small box, or doing nothing at all except to replicate itself. These types of infections tend to be localized to your computer and not have the ability to spread to another computer on their own. The word virus has incorrectly become a general term that encompasses trojans, worms, and viruses.

Worm - A program that when run, has the ability to spread to other computers on its own using either mass-mailing techniques to email addresses found on your computer or by using the Internet to infect a remote computer using known security holes.

How these infections start
Just like any program, in order for the program to work, it must be started. Malware programs are no different in this respect and must be started in some fashion in order to do what they were designed to do. For the most part these infections run by creating a configuration entry in the Windows Registry in order to make these programs start when your computer starts.

Unfortunately, though, in the Windows operating system there are many different ways to make a program start which can make it difficult for the average computer user to find manually. Luckily for us, though, there are programs that allow us to cut through this confusion and see the various programs that are automatically starting when windows boots. The program we recommend for this, because its free and detailed, is Autoruns from Sysinternals.
When you run this program it will list all the various programs that start when your computer is booted into Windows. For the most part, the majority of these programs are safe and should be left alone unless you know what you are doing or know you do not need them to run at startup.

At this point, you should download Autoruns and try it out. Just run the Autoruns.exe and look at all the programs that start automatically. Don't uncheck or delete anything at this point. Just examine the information to see an overview of the amount of programs that are starting automatically. When you feel comfortable with what you are seeing, move on to the next section.
 
Use an anti-virus and anti-malware program to remove the infections
Make sure you are using an anti-virus program and that the anti-virus program is updated to use the latest definitions. If you do not currently have an anti-virus installed, you can select one from the following list and use it to scan and clean your computer. The list below includes both free and commercial anti-virus programs, but even the commercial ones typically have a trial period in which you can scan and clean your computer before you have to pay for it.
It is also advised that you install and scan your computer with MalwareBytes' Anti-Malware and SUPERAntiSpyware. Both of these are excellent programs and have a good track record at finding newer infections that the more traditional anti-virus programs miss. 

After performing these instructions if you still are infected, you can use the instructions below to manually remove the infection.
 
How to remove these infections manually
We have finally arrived at the section you came here for. You are most likely reading this tutorial because you are infected with some sort of malware and want to remove it. With this knowledge that you are infected, it is also assumed that you examined the programs running on your computer and found one that does not look right. You did further research by checking that program against our Startup Database or by searching in Google and have learned that it is an infection and you now want to remove it.

If you have identified the particular program that is part of the malware, and you want to remove it, please follow these steps.
  1. Download and extract the Autoruns program by Sysinternals to C:\Autoruns
     
  2. Reboot into Safe Mode so that the malware is not started when you are doing these steps. Many malware monitor the keys that allow them to start and if they notice they have been removed, will automatically replace that startup key. For this reason booting into safe mode allows us to get past that defense in most cases.
     
  3. Navigate to the C:\Autoruns folder you created in Step 1 and double-click on autoruns.exe.
     
  4. When the program starts, click on the Options menu and enable the following options by clicking on them. This will place a checkmark next to each of these options.
    1. Include empty locations
       
    2. Verify Code Signatures
       
    3. Hide Signed Microsoft Entries
       
  5. Then press the F5 key on your keyboard to refresh the startups list using these new settings.
     
  6. The program shows information about your startup entries in 8 different tabs. For the most part, the filename you are looking for will be found under the Logon or the Services tabs, but you should check all the other tabs to make sure they are not loading elsewhere as well. Click on each tab and look through the list for the filename that you want to remove. 
  7.  
  8. The filename will be found under the Image Path column. There may be more than one entry associated with the same file as it is common for malware to create multiple startup entries. It is important to note that many malware programs disguise themselves by using the same filenames as valid Microsoft files. it is therefore important to know exactly which file, and the folder they are in, that you want to remove. You can check our Startup Database for that information or ask for help in our computer help forums.
     
  9. Once you find the entry that is associated with the malware, you want to delete that entry so it will not start again on the next reboot. To do that right click on the entry and select delete. This startup entry will now be removed from the Registry.
     
  10. Now that we made it so it will not start on boot up, you should delete the file using My Computer or Windows Explorer. If you can not see the file, it may be hidden. To allow you to see hidden files you can follow the steps for your operating system found in this tutorial: 
  11.  
  12. When you are finished removing the malware entries from the Registry and deleting the files, reboot into normal mode as you will now be clean from the infection.
How to protect yourself in the future
In order to protect yourself from this happening again it is important that take proper care and precautions when using your computer. Make sure you have updated antivirus and spyware removal software running, all the latest updates to your operating system, a firewall, and only open attachments or click on pop-ups that you know are safe. 


Conclusion
Now that you know how to remove a generic malware from your computer, it should help you stay relatively clean from infection. Unfortunately there are a lot of malware that makes it very difficult to remove and these steps will not help you with those particular infections. In situations like that where you need extra help, do not hesitate to ask for help in our computer help forums. We also have a self-help section that contains detailed fixes on some of the more common infections that may be able to help.
 
 
Ultimate protection for everything you do online


how to start windows operating system computer in safe mode

Ultimate protection for everything you do online
How to start Windows in Safe Mode: from bleepingcomputer forum (HERE)

In this tutorial post, you will be reading the tutorial guide as shown in the content table below:

  1. Introduction
  2. Windows 95
  3. Windows 98/ME
  4. Windows 2000
  5. Windows XP
  6. Windows Vista
  7. Windows 7
  8. Windows 8
  9. Problems that can occur by forcing Safe Mode using the System Configuration Utility
  10. Conclusion


(Protect Your PC,iPads, Phone devices etc from being hacked,attacked by virus, malware, spyware...with guides on http://everydaymoviesextra.blogspot.com/2014/04/how-to-remove-spyware-adware-and.html)


Introduction
Windows Safe Mode is a way of booting up your Windows operating system in order to run administrative and diagnostic tasks on your installation. When you boot into Safe Mode the operating system only loads the bare minimum of software that is required for the operating system to work. This mode of operating is designed to let you troubleshoot and run diagnostics on your computer. Windows Safe Mode loads a basic video drivers so your programs may look different than normal.
For Win98/ME, XP, Vista and Windows 7 there are two methods of booting into Safe Mode, while 95 and 2000 only have one. We will describe these methods below:

F8 - By pressing the F8 key right when Windows starts, usually right after you hear your computer beep when you reboot it, you will be brought to a menu where you can choose to boot into safe mode. If it does not work on the first try, reboot and try again as you have to be quick when you press it. I have found that during boot up right after the computer shows you all the equipment , memory, etc installed on your computer, if you start lightly tapping the F8 key you will usually be able to get to the desired menu.

System Configuration Utility - You can use the System Configuration Utility, or MSCONFIG, found in Windows 98, ME, XP, Windows Vista, and Windows 7 to make Windows boot into Safe Mode on the next reboot. We will go into specific details in the sections below. Please note, that you should not force your computer to boot into Safe Mode using the System Configuration Utility if you suspect you are infected with malware as the malware may corrupt keys required to boot into Safe Mode. 

(Protect Your PC,iPads, Phone devices etc from being hacked,attacked by virus, malware, spyware...with guides on http://everydaymoviesextra.blogspot.com/2014/04/how-to-remove-spyware-adware-and.html)


Windows 95
Windows 95 can only boot into Safe Mode using the F8 method as it does not have a System Configuration Utility.

Using the F8 Method:
  1. Restart your computer.
  2. When the machine first starts it will generally list some equipment that is installed in your machine, amount of memory, hard drives installed etc. When it is finished with that it will say "Starting Windows 95". Immediately after seeing "Starting Windows 95" press the F8 key.
  3. You will now be presented with a menu. Select the option for Safe Mode using the arrow keys.
  4. Then press enter on your keyboard to boot into Safe Mode.
  5. Do whatever tasks you require and when you are done reboot to boot back into normal mode.
Windows 98/ME
NOTE: Windows ME may look slightly different than what is shown in the images below. You should still have no problem following along.
Using the F8 Method:
  1. Restart your computer.
  2. When the machine first starts again it will generally list some equipment that is installed in your machine, amount of memory, hard drives installed etc. At this point you should gently tap the F8 key repeatedly until you are presented with a menu.
  3. When you have the menu on the screen. Select the option for Safe Mode using the arrow keys.
  4. Then press enter on your keyboard to boot into Safe Mode.
  5. Do whatever tasks you require and when you are done reboot to boot back into normal mode.
Using the System Configuration Tool Method:
Step 1: Close all programs so that you have nothing open and are at the desktop.
Step 2: Click on the Start button then click on Run.
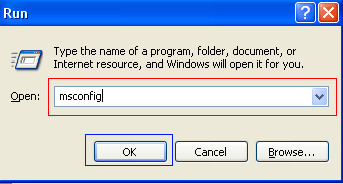
Step 3: In the Run field type msconfig as shown in the image below.
http://digitalpowering.blogspot.com/2014/04/how-to-fix-common-windows-8-and-windows.html
Figure 1. Starting Msconfig
 
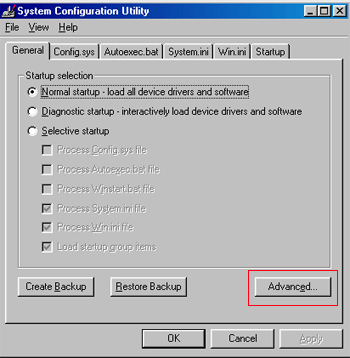
Step 4: Press the OK button and the System Configuration Utility will start up. You will then see a screen similar to Figure 2 below.
 
http://digitalpowering.blogspot.com/2014/04/how-to-fix-common-windows-8-and-windows.html
Figure 2. SCU Startup Screen
Step 5: You should now press the Advanced button designated by the red box in the figure above and you will see a screen similar to figure 3 below.
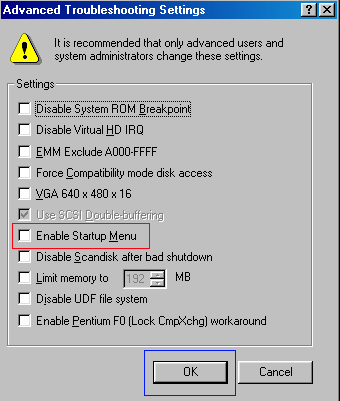
 
http://digitalpowering.blogspot.com/2014/04/how-to-fix-common-windows-8-and-windows.html
Figure 3. Advanced Options
 
Step 6: Place a check mark in the checkbox labeled "Enable Startup Menu" designated by the red box in Figure 3 above. Then press the OK button and then the OK button again. Windows 98/ME will now prompt if you would like to reboot as shown in Figure 4 below.
 
http://digitalpowering.blogspot.com/2014/04/how-to-fix-common-windows-8-and-windows.html
Figure 4. Confirm Reboot
 
Step 7: Press the Yes button and your computer will restart into Safe Mode.
Step 8: When the computer boots up perform what diagnostic or troubleshooting tasks you require.
Step 9. When you are finished with these tasks, complete steps 1-7 again, but in Step 6 this time uncheck the checkbox labeled "Enable Startup Menu".
Step 10: Reboot the computer back into normal mode.
Windows 2000
Windows 2000 can only boot into Safe Mode using the F8 method as it does not have a System Configuration Utility.
Using the F8 Method:
  1. Restart your computer.
  2. When the machine first starts again it will generally list some equipment that is installed in your machine, amount of memory, hard drives installed etc. When that is completed it will start loading Windows.
  3. When you see the screen that has a black and white bar at the bottom stating "Starting Windows", tap the F8 key repeatedly until you get to the Windows 2000 Advanced Options Menu
  4. At this menu use the arrow keys to select the Safe Mode option, which is usually the first in the list.
  5. Press the enter key.
  6. Your computer will continue booting, but now will boot into Safe Mode.
  7. Do whatever tasks you require and when you are done reboot to boot back into normal mode.
Windows XP
Using the F8 Method:
  1. Restart your computer.
  2. When the machine first starts again it will generally list some equipment that is installed in your machine, amount of memory, hard drives installed etc. At this point you should gently tap the F8 key repeatedly until you are presented with a Windows XP Advanced Options menu.
  3. Select the option for Safe Mode using the arrow keys.
  4. Then press enter on your keyboard to boot into Safe Mode.
  5. Do whatever tasks you require and when you are done reboot to boot back into normal mode.
Using the System Configuration Tool Method:
Note: If you are having trouble entering Safe Mode via the F8 method, you should not use this method to force it to startup into safe mode. For reasons why, you should read this.
Step 1: Close all programs so that you have nothing open and are at the desktop.
Step 2: Click on the Start button then click on Run.
Step 3: In the Run field type msconfig as shown in the image below.
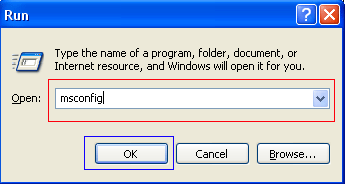
http://digitalpowering.blogspot.com/2014/04/how-to-fix-common-windows-8-and-windows.html
Figure 4. Starting Msconfig
 
Step 4: Press the OK button and the System Configuration Utility will start up. You will then see a screen similar to Figure 5 below.
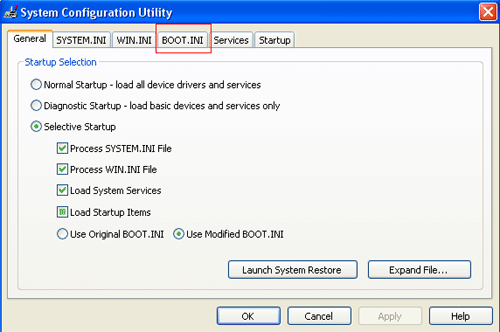
 
http://digitalpowering.blogspot.com/2014/04/how-to-fix-common-windows-8-and-windows.html
Figure 5. Starting the System Configuration Utility
 
Step 5: Click on the tab labeled "BOOT.INI" which is designated by the red box in Figure 5 above. You will then be presented with a screen similar to Figure 6 below.
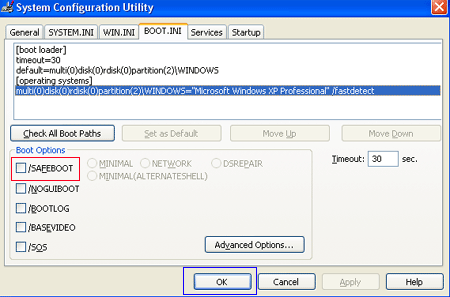
 
http://digitalpowering.blogspot.com/2014/04/how-to-fix-common-windows-8-and-windows.html
Figure 6. BOOT.INI Tab
 
Step 6: Put a check mark in the checkbox labeled "/SAFEBOOT" designated by the red box in Figure 6 above. Then press the OK button. After pressing the button you will be presented with a confirmation box as shown in Figure 7 below.
 
http://digitalpowering.blogspot.com/2014/04/how-to-fix-common-windows-8-and-windows.html
Figure 7. Confirm Reboot
 
Step 7: Press the Restart button and let the computer reboot. It will now boot up into Safe Mode.
Step 8: When the computer boots up do what diagnostic or troubleshooting tasks that you need to do.
Step 9. When are finished with your tasks, complete steps 1-7 again, but in Step 6 this time uncheck the checkbox labeled "/SAFEBOOT". Then click on the General tab and set it for Normal startup.
Step 10: Reboot the computer back into normal mode.

Windows Vista
Using the F8 Method:
  1. Restart your computer.
  2. When the computer starts you will see your computer's hardware being listed. When you see this information start to gently tap the F8 key repeatedly until you are presented with the Windows Vista Advanced Boot Options.
  3. Select the Safe Mode option using the arrow keys.
  4. Then press the enter key on your keyboard to boot into Vista Safe Mode.
  5. When Windows starts you will be at a typical logon screen. Logon to your computer and Vista will enter Safe mode.
  6. Do whatever tasks you require, and when you are done, reboot to go back into normal mode.
Using the System Configuration Tool Method:
Note: If you are having trouble entering Safe Mode via the F8 method, you should not use this method to force it to startup into safe mode. For reasons why, you should read this.
  1. Close any running programs and open Windows so you are back at the desktop.
     
  2. Click on the Start (http://digitalpowering.blogspot.com/2014/04/how-to-fix-common-windows-8-and-windows.html) button.
     
  3. In the Start Menu Search Box (http://digitalpowering.blogspot.com/2014/04/how-to-fix-common-windows-8-and-windows.html) type msconfig and press enter on your keyboard.
     
  4. The System Configuration utility will open and you will see a screen similar to the one below.
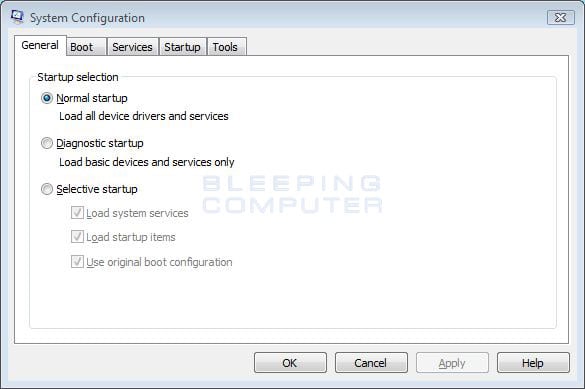


    Vista System Configuration Utility
    Figure 8. Vista System Configuration Utility


    Click on the Boot tab.
  5. You will now be at the Boot options screen as shown below.
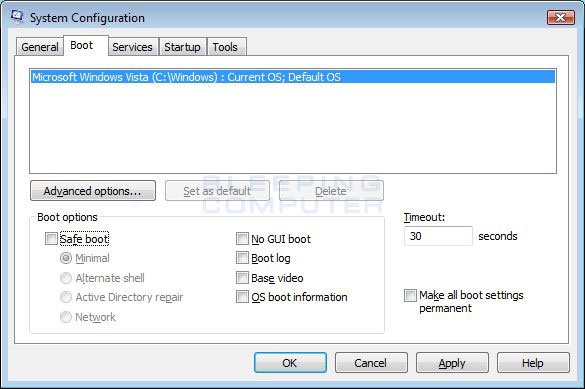


    Vista Boot tab in the System Configuration utility
    Figure 9. Vista Boot tab in the System Configuration utility


    Put a check mark in the checkbox labeled Safe boot
     
  6. Press the Apply button and then press the OK button.
     
  7. You will now be presented with a prompt stating that you need to reboot the computer to apply the change.
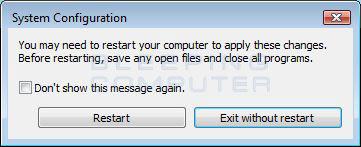


    Restart Prompt
    Figure 10. Restart Prompt


    Click on the Restart button to reboot your computer.
     
  8. Your computer will now restart directly into Safe Mode. When you get to the Vista logon screen, log on to the computer and perform any necessary tasks.
     
  9. When done with your tasks, from within Safe Mode, start msconfig.
     
  10. When the program is open, and you are on the General tab, select the option labeled Normal Startup.
     
  11. Then press the Apply button and then the OK button.
     
  12. When the programs prompts you to reboot, allow it to do so, and you will boot back into Windows Vista in normal mode.
 
Windows 7
Using the F8 Method:
  1. Restart your computer.
  2. When the computer starts you will see your computer's hardware being listed. When you see this information start to gently tap the F8 key on your keyboard repeatedly until you are presented with the Windows 7 Advanced Boot Options screen as shown in the image below.
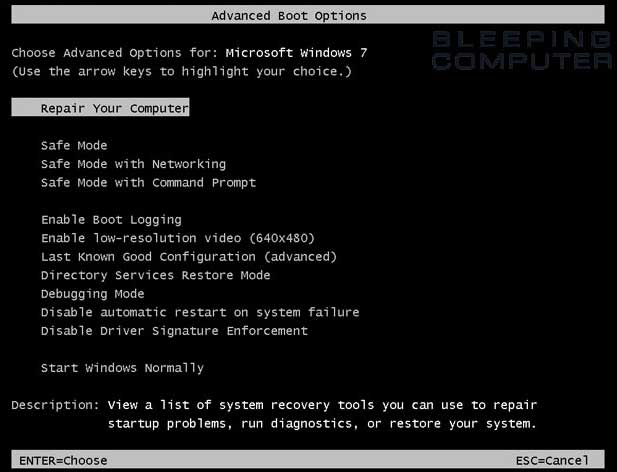

    Figure 11. Windows 7 Advanced Boot Options screen
    Figure 11. Windows 7 Advanced Boot Options screen
  3. Using the arrow keys, select the Safe Mode option you want.
  4. Then press the enter key on your keyboard to boot into Windows 7 Safe Mode.
  5. When Windows starts you will be at a typical logon screen. Logon to your computer and Windows 7 will enter Safe mode.
  6. Do whatever tasks you require, and when you are done, reboot to go back into normal mode.
Using the System Configuration Tool Method:
Note: If you are having trouble entering Safe Mode via the F8 method, you should not use this method to force it to startup into safe mode. For reasons why, you should read this.
  1. Close any running programs and open Windows so you are back at the desktop.
     
  2. Click on the Start (http://digitalpowering.blogspot.com/2014/04/how-to-fix-common-windows-8-and-windows.html) button.
     
  3. In the Start Menu Search Box type msconfig as shown in Figure 12 below.


    Figure 12. Windows 7 Search box
    Figure 12. Windows 7 Search box


    Then press enter on your keyboard.
     
  4. The System Configuration utility will open and you will see a screen similar to the one below.
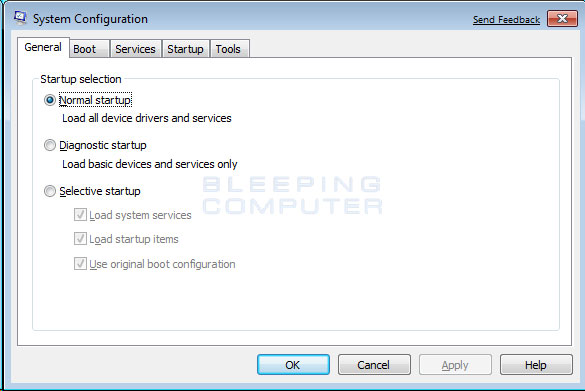


    Vista System Configuration Utility
    Figure 13. Windows 7 System Configuration Utility


    Click on the Boot tab.
     
  5. You will now be at the Boot screen as shown below.


    Vista Boot tab in the System Configuration utility
    Figure 14. Windows 7 Boot tab in the System Configuration utility


    Put a check mark in the checkbox labeled Safe boot
     
  6. Press the Apply button and then press the OK button.
     
  7. You will now be presented with a prompt stating that you need to reboot the computer to apply the change.


    Figure 15. Restart Prompt
    Figure 15. Restart Prompt


    Click on the Restart button to reboot your computer.
     
  8. Your computer will now restart directly into Safe Mode. When you get to the Windows 7 logon screen, log on to the computer and perform any necessary tasks.
     
  9. When done with your tasks, from within Safe Mode, start msconfig.
     
  10. When the program is open, and you are on the General tab, select the option labeled Normal Startup.
     
  11. Then press the Apply button and then the OK button.
     
  12. When the programs prompts you to reboot, allow it to do so, and you will boot back into Windows 7 in normal mode.
 
Windows 8
For a detailed tutorial on how to boot Windows 8 into Safe Mode, please see this tutorial:
Using the Advanced startup options method:
  1. From the Windows Start screen, type Advanced startup and when the search results appear, click on the Settings category and then click on the Advanced startup options search option.
     
  2. When the Settings screen opens, scroll down and click on the Restart now button under the Advanced Startup category and your computer will restart.
     
  3. When the Advance startup menu appears, click on the Troubleshoot option.
     
  4. Then click on the Advanced Options button.
     
  5. Finally click on the Startup Settings option and then click on the Restart button. Your computer will now restart again.
     
  6. When you get to the Startup Settings screen, press the number for the Safe Mode option you wish to use.
     
  7. Do whatever tasks you require, and when you are done, reboot to go back into normal mode.

Using the System Configuration Tool Method:
Note: If you are having trouble entering Safe Mode via the Advanced Startup menu, you should not use this method to force it to startup into safe mode. For reasons why, you should read this.
  1. Go to the Windows Start screen and type msconfig. When the msconfig search results appears, click on it.

     
  2. The System Configuration utility will open and you will see a screen similar to the one below.


    Vista System Configuration Utility

    Click on the Boot tab.
     
  3. You will now be at the Boot screen as shown below.


    Vista Boot tab in the System Configuration utility


    Put a check mark in the checkbox labeled Safe boot
     
  4. Press the Apply button and then press the OK button.
     
  5. You will now be presented with a prompt stating that you need to reboot the computer to apply the change.


    Figure 15. Restart Prompt


    Click on the Restart button to reboot your computer.
     
  6. Your computer will now restart directly into Safe Mode. When you get to the Windows 8 logon screen, log on to the computer and perform any necessary tasks.
     
  7. When done with your tasks, from within Safe Mode, go back to the Start screen by pressing the Tab key on your keyboard. Then start msconfig again by typing msconfig and then clicking on its search result.
     
  8. When the program is open, and you are on the General tab, select the option labeled Normal Startup.
     
  9. Then press the Apply button and then the OK button.
     
  10. When the programs prompts you to reboot, allow it to do so, and you will boot back into Windows 8 in normal mode.
 
Problems that can occur by forcing Safe Mode using the System Configuration Utility
It is possible to make your computer continuously boot up into safe mode using the System Configuration utility as described above. The program does this by changing your boot.ini file, the settings file that configures your computer's boot sequence, and adding the /safeboot argument to your operating systems startup line. An example of this can be seen below.
 
Original [operating systems]
multi(0)disk(0)rdisk(0)partition(2)\WINDOWS="Microsoft Windows XP Professional" /FASTDETECT /NOEXECUTE=OPTIN
After using MsConfig.exe [operating systems]
multi(0)disk(0)rdisk(0)partition(2)\WINDOWS="Microsoft Windows XP Professional" /FASTDETECT /NOEXECUTE=OPTIN /safeboot:minimal
When you are done using safe mode, you would then run the System Configuration utility again and uncheck the /Safeboot option, thus removing the /safeboot argument from the boot.ini file, and allowing your computer to boot up normally.
On a computer that is operating properly this is normally not a problem. Unfortunately, though, a new trick that some of the more recent malware are using is to delete certain Windows Registry keys so that your computer can not properly boot into safe mode. It is in these situations that using the System Configuration utility to boot into safe mode can cause the computer to become inoperable for many users.
This is because once you set the computer to boot into Safe Mode using /Safeboot, it will continuously attempt to start Safe Mode until the /safeboot argument is removed from the boot.ini. Since the malware is not allowing us to actually boot into safe mode, you have no way of getting to a point where you can run the System Configuration utility again to uncheck the /Safeboot option. Thus, you are stuck with a computer constantly attempting to get into safe mode and not being able to do so.
If a situation like this has happened to you it is possible to fix this problem by renaming your boot.ini file. The first step would be to use a boot disk to start your computer. If your computer does not have a floppy disk, then you can typically boot off the Windows CD that came with your computer in order to access the Windows Recovery Console. More information about the Windows Recovery Console can be found here. Once booted to a command prompt, you would simply rename your C:\Boot.ini file to another name like C:\Boot.ini.bak. The command to rename the file at the command prompt is:
ren C:\Boot.ini Boot.ini.bak
Once the file is renamed, you can then remove the boot disk and reboot your computer to get back to normal mode. When booting up after the rename, do not be surprised if you see an error stating that you do not have a valid Boot.ini file. When you get back to normal Windows mode, you can then rename C:\Boot.ini.bak to C:\Boot.ini and run Msconfig again to remove the /safeboot flag.
 
Conclusion
It is not uncommon when people are helping you troubleshoot your computer that they tell you to enter Safe Mode. With this tutorial you should now know how to enter Safe Mode when it is required.

(Protect Your PC,iPads, Phone devices etc from being hacked,attacked by virus, malware, spyware...with guides on http://everydaymoviesextra.blogspot.com/2014/04/how-to-remove-spyware-adware-and.html)


Source: From
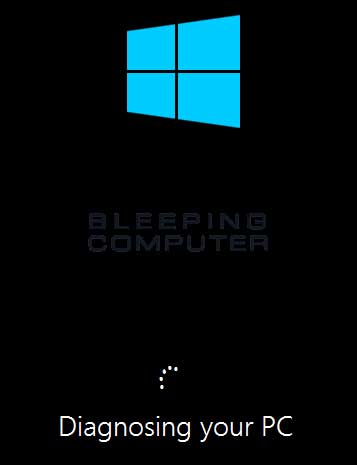
how to fix Windows 8 eror using Automatic Repair

From:  bleepingcomputer forum
 
Windows 8 includes a recovery feature called Automatic Repair that attempts to automatically diagnose and fix common issues that may cause Windows 8 to not start properly.  

Automatic Repair will start automatically when Windows is unable to start properly. Once started, it will scan various settings, configuration options, and system files for corrupt files and settings.  If it detects anything, it will automatically attempt to fix them for you.

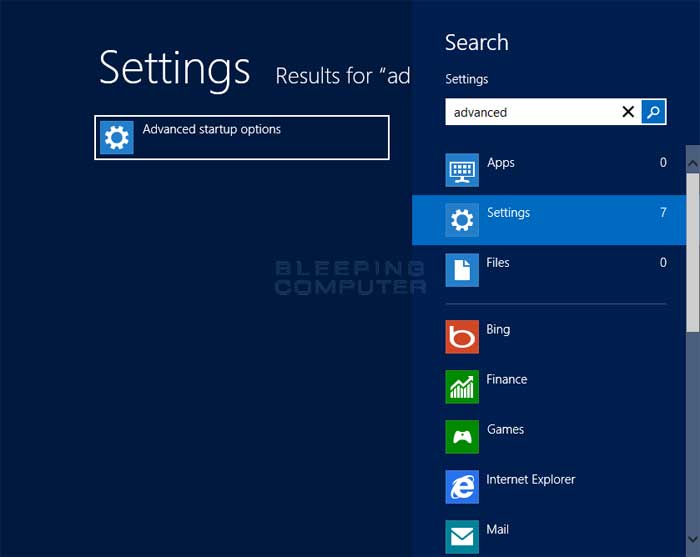
To access Automatic Repair in the Windows Recovery Environment you need to go to the Windows 8 Start Screen and type Advanced. When the search results appear click on the Settings category as shown below.

Protect Your PC,iPads, Phone devices etc from being hacked,attacked by virus, malware, spyware...with guides on http://everydaymoviesextra.blogspot.com/2014/04/how-to-remove-spyware-adware-and.html)


Advanced start screen search
 
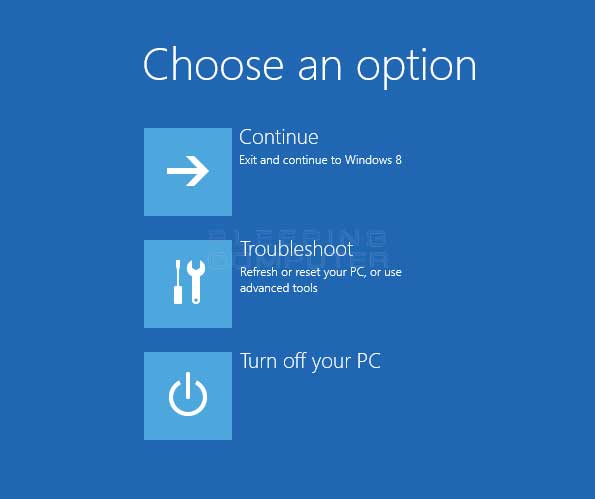
Now click on the option labeled Advanced startup options and you will be brought to the General PC Settings screen. Scroll down to the bottom until you see an option labeled Advanced startup. Click on the Restart now button and Windows 8 will restart your computer and go directly into the Advanced Startup options menu.
 
Advanced startup options menu
 
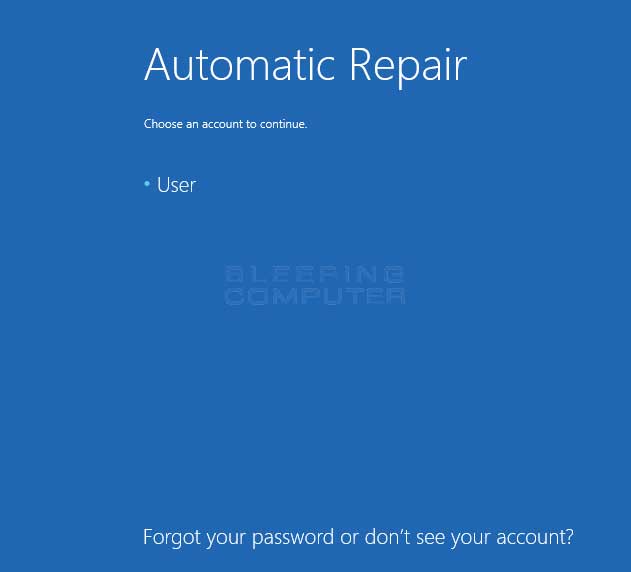
Now click on the Troubleshoot button and then the Advanced options button. When the advanced options screen opens, click on the Automatic Repair option. Your computer will now reboot and you will then be shown a screen where Windows states it is preparing Automatic Repair. When it is done, you will be shown a screen where you need to select an Administrator account that you wish to login with.

Protect Your PC,iPads, Phone devices etc from being hacked,attacked by virus, malware, spyware...with guides on http://everydaymoviesextra.blogspot.com/2014/04/how-to-remove-spyware-adware-and.html)

 
Select an administrator account
 
Please click on the account you wish to use. If your account has a password on it, you will be required to enter it and then click on the Continue button to continue with the automatic repair. Automatic will now start and attempt to diagnose the problem with your computer.
 
Automatic Repair diagnosing the computer
 
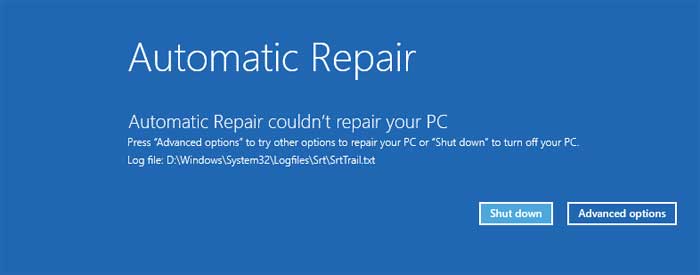
The automatic repair process can take a quite a while, so please be patient while Automatic Repair attempts to find a repair startup problems in Windows 8. During this process your computer may reboot. This is perfectly normal and nothing to worry about. Once the automatic repair process has completed it will tell if you if it was able to repair anything. If it was not able to repair anything you will be shown a prompt asking if you wish to shutdown or use some other tools.
 
Automatic repair could not fix the problem
 
At this point, if your computer is still unable to start up, you should you click on the Advanced options button, followed by Troubleshoot, and finally Advanced options. On this screen you can select other tools to use to diagnose your problem.
 

Protect Your PC,iPads, Phone devices etc from being hacked,attacked by virus, malware, spyware...with guides on http://everydaymoviesextra.blogspot.com/2014/04/how-to-remove-spyware-adware-and.html)


Popular Search Tags:

 windows operating system update, error 80073712, error code 0x643, windows update error

80070103, Error Code 646, error 651, windows 7 fix Error Code 80072EFE, Error Code

0x80004005, Error Code 1000008e, Windows Update Error, Windows Update Error 643, Error

1606, Error Code 0xc0000005, Windows Error Recovery, windows update error 80072ee2,

Error 1706 0x80072ee2, Error Code 0x80070017, windows update error code 643 0x8e

0x1000008e,  Windows Update Error 80072F8F, Stop Error Error Code 0x80070035, Error

Code 1231, Error Code 0x80070005, windows update error 8024402c, Windows Installer

Package Error, Error Code 0x8007042c, Error Code 0x8007232b, autochk program not found

Code 66A, Fatal Error C0000034, Error Code 0x80070002, Error Code 5000, Error Code

0x80010108, Windows Update Error 80070490, Windows Live Mail Error ID 0x800CCC0E,

windows Error Code 38, Error Code 42, Windows Update Error 800b0100, Windows Update

Error 80070005, Error Code 0x80070570 PPPoE, Error 651, No Sound Error Code 8003, Error

Code 1603, windows update error 8024200d, YouTube error 1068, windows operating system

7 0x80072EFD, windows 7, win 8, windows 8, microsoft windows operating system,

Source: http://www.bleepingcomputer.com/tutorials/http-wwwbleepingcomputercom-tutorials-automatically-repair-windows-8-with-automatic-repair-/


download windows 8 or 8.1 original product key


Ultimate protection for everything you do online

How to find your Windows 8 or 8.1 product key (from digitaltrends.com)

Product keys gatekeepers that prevent widespread piracy, but if there’s one drawback to them, it’s the fact that they can be misplaced quite easily. There’s a good chance your Windows product key is deeply buried within an email inbox full of spam, entombed in the dark recesses of your closet, or otherwise inaccessible. Thankfully, Windows users can easily extract the key from the Windows Registry using a product key finder in less than 15 minutes. 


Here’s our guide on how to find your Windows 8 or 8.1 product key Also, check out top picks for the best product key finders, along with our guides on how to install Windows 8 and how to upgrade to Windows 8.1

Step 1: Download Windows 8 Product Key Viewer

Click here, to download Windows 8 Product Key Viewer. Afterward, title and select a save location for the file. The app is lightweight and sports a no-frills interface.

Step 2: Run the program

Once downloaded, double-click the zip folder and open executable file, “pkeyui.exe”. Then, click the Run button.

Step 3: Take down your Windows product key

Once found, note the 25-character product key, ensuring the combination of letters and numbers is copied exactly as shown.

WindowsKeyFinalNew copy

Note: Locating your product key via Windows Product Key Finder isn’t fool-proof. Thankfully, there are other methods of locating your Windows 8 product key as well. You can contact Microsoft and request a product key if you purchased a retail version of Windows 8, or if the software came pre-installed on your computer, simply contact the manufacturer for a replacement key. 

Ultimate protection for everything you do online


COMPUTER-SOFTWARES HELP CENTER

free counters